One thing we have realized over time is there aren’t many examples of Microsoft Power Apps formulas across the internet. This post is dedicated to starting a list of formulas we find useful regardless of your skill level. This article will continue to be updated over time so check back often. We hope you enjoy!
Microsoft Power Apps Best Practices
- Power Apps creates a lot of objects when you add fields and forms. Take some time and relabel objects if they will have any sort of logic added to them. It will help you long term in identifying what everything is doing behind the scenes. Datcard4.value is not every useful for anyone.
- Spend some time thinking about what screens you will need and what elements you will want on all of them. This might is usually a top or left navigation. It may also be a footer. Once you identify what elements you want on all screens, you might be able to create reusable elements to help optimize performance.
- If you company has branding guidelines, review those before you begin building. This typically includes fonts, colors and icons. If your company does not have formal branding guidelines, come up with a color scheme and ensure the people who will be using the app like it before you start using it everywhere.
- Review short and long term data management and storage expectations up front. There are limits on how much data Power Apps can get from different data sources. Those limits need to be explored and factored in before any data source is added to your app.
- Determine if you need your Power App needs to be built in a development environment first. This typically depends on how many people are working on the Power App as well as how many Power Apps your company uses. If you are the only one managing the Power App, then you may be fine developing in Production. If multiple people are developing the app and your company already has multiple Power Apps that are live, it might be a good idea to build in a development environment first.
Examples of Microsoft Power Apps Formulas
Filter a Power Apps Gallery Using an Or Statement for Multiple Fields
You can filter a Power Apps gallery using multiple fields. This enables a customized search experience where you can include and exclude information that people will be searching and filtering with. To filter a Power Apps gallery using an or statement for multiple fields:
- Add a textbox to your Power App and rename it such as “Searchbox”.
- Have you data source defined with multiple fields and added to your Power App. Let’s assume there are 3 fields named Title, Status and AssignedTo for a data source named CompanyTasks.
- Add a gallery to your Power App and associate it to the data source.
- Select the “Items” property of the gallery. The Items formula should be set to CompanyTasks.
- The formula to filter the gallery items based on the text in the Searchbox for all 3 data source fields is Filter(CompanyTasks, Or(Searchbox.Text in Title, Searchbox.Text in Status, Searchbox.Text in AssignedTo)
There are many variations of the above and how you handle search. Always be aware of delegation limits. Also, people may only want to do exact search matches or “start with” search matches. It is good to vet how the users want to exactly so they get the best results.
Filter(CompanyTasks, Or(Searchbox.Text in Title, Searchbox.Text in Status, Searchbox.Text in AssignedTo)
Clear a Textbox or Field in Power Apps
You can clear a textbox or field by doing the following:
- Ensure the field you want to clear is properly named. For this example, let’s use the field name “Searchbox”
- Add an icon to your Power App screen. We recommend the ‘Cancel’ icon and putting the icon next to the field you want to clear.
- Select the “OnSelect” property of the icon.
- Add the formula Reset(Searchbox) to the OnSelect property.
Searchbox is the name of the field from step 1 so remember to update that to your specific field value.
Add Line Breaks to Labels or Textboxes in Power Apps
To add line line breaks to labels or textboxes in Power Apps, use Char(13) in the Text property for a label or Default property for a textbox. Why would you use a textbox with a large, default block of text? A textbox has different design options than a label. Use the right field type depending on what you are trying to accomplish.
Here is an example of adding a line break formula in Power Apps”
“Line 1” & Char(13) & “Line 2”
Adding two Char(13) will add an extra space between each row of text. For instance:
“Line 1” & Char(13) & Char(13) & “Line 2”
Open SharePoint Online Files using Power Apps in a Different Browser Tab
It is easy to open SharePoint Online files using Power Apps in a different browser tab.
To set this up:
- Ensure you have a document library with files in SharePoint Online.
- Add a gallery to the Power Apps screen you would like to open files from and connect it to the SharePoint document library.
- Set the “right” icon OnSelect property to Launch(ThisItem.’Link to Item’)
Launch(ThisItem.’Link to item’)
Conditional Show and Hide Fields
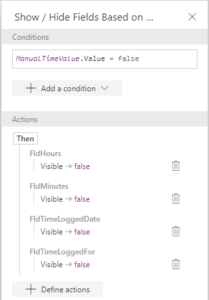
You can reuse the same conditional over and over again for any field that you need to apply the conditional. Make sure everything is labelled properly.
