Automation is all the rage nowadays, and with good reason. Not only is it tiring to keep repeating the same task over and over, it’s also time you’d probably better spend doing something else.
Today we’re talking about a function in Microsoft Word that most people don’t know about: Macros, which are rules that map certain behaviors and let you accomplish repetitive tasks automatically. Odds are, you’re already using them if you hit Ctrl+S (or Cmd+S on MacOS) to save your documents. Any pre-defined keyboard shortcut is a Macro.
Create Your First Macro
To start with, you don’t need coding knowledge to build simple, effective Macros in Word. We’ll give you an example where you can automatically add an image to your documents with a single click.
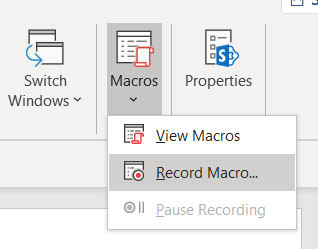
To begin, just select View->Macros->Record Macro.

A new box will pop up, where you can choose your Macro’s name, whether it runs at the click of a button or through a keyboard shortcut, and where it’s stored. If you want the Macro to be available across all documents you create, just store it in All Documents (Normal.dotm). We’ll go ahead and name our Macro “Test,” as well as writing something simple in the description.
Now click on “Button”. A new pop-up will appear.
Notice how Autosave, Save, Undo, and Redo are all on the right-side panel? Like we said above, those are pre-defined Macros,
and they’re present in all documents. The “Normal.NewMacros.Test” is our macro: Normal.NewMacros is its path, followed by the name, Test. Go ahead and add our Macro to that list by clicking on “Add”. Once it’s there, you can
click on “Modify” to select the Macro icon that will show in your panel. Since we’re adding a picture, we chose the picture icon. Click on OK, and you’ll be brought back to your document.
If you’ve been following these steps, Word will now be recording your Macro. Now click on Insert->Pictures, and navigate to the folder where your chosen picture is. The Macro will always search for the picture in that folder once you apply it later.
Insert the picture in your document, then go back to View->Macros->Stop Recording. And that’s it! You’ve created your first Macro in Microsoft Word. To use it again, just click on the icon you chose in the shortcut panel (in this case, the picture), and voilá!
If you wanted to assign the Macro to a keystroke, you also could. Instead of clicking on “Button” when prompted, choose “Keystroke” and pick your combination—just be careful to check if it’s not a keystroke that’s already been assigned!
Coding Your Macros
You might be thinking, “Oh, but I can just insert the picture manually, it’s not that much work.” But imagine doing that for every company letter—much easier to record the Macro once and never go through those steps again. Not just that, you can do more—resize the picture, change its formatting, etc. while you’re recording the Macro, saving you the time it’d take to perform all those simple actions again.
Once you feel comfortable using basic Macros, you can start experimenting with Visual Basic and code for more elaborate needs. First, make sure the Developer Tab is visible, then click on Visual Basic, and it’ll open the editor. Ours automatically opened with our Test Macro.
Sub indicates the start of a subroutine, and Test is the name you’ve chosen. You can see in green that it shows what we’ve filled out in the original box: that’s the description, and is in the form of comments, which the compiler will ignore. Regular text is the Macro’s behavior, and then End Sub ends the subroutine.
This way, you can start a basic Macro without coding, and editing it manually.
For instance, try copying the instruction lines, but change the file name (we went with TestImage2.png) then hit Save. When you run the macro again, it will add both images to your Word Document!
If you’re curious about VBA and Macros, Microsoft’s documentation is a solid place to start.
Can You Give More Examples?
Essentially, most things you do in Word can be automated via Macros. Imagine you’re constantly using tables for a report, and vary little varies between one and the next. Just create a Macro that inserts the table with your desired number of columns and rows, and you’re set, not just for this document, but for any future one.
Another great Macro application is for Find and Replace. It’s easy when it’s a single word, but when it’s several, you find yourself doing to same task for different words several times. Instead, you can have a Macro with a list of words you find yourself using a lot, run it, and all the words in that list will be highlighted in the document. And that goes for a lot of features Word offers. And if you find yourself lost, odds are, you’ll find an example similar to what you want that you can work on.
Bottom line is, Macros increase productivity and keep you from repetitive tasks—there’s no reason not to start using them!